")
Introduction:
Python is a widely used
high-level programming language first launched in 1991. Since then, Python has
been gaining popularity and is considered as one of the most popular and
flexible server-side programming languages.
Unlike most Linux distributions,
Windows does not come with the Python programming language by default. However,
you can install Python on your Windows server or local
machine in just a few easy steps.
What is Python?
Python is a popular programming language. It was created by Guido van Rossum, and released in 1991.
It is used for:
- web development (server-side),
- software development,
- mathematics,
- system scripting.
What can Python do?
- Python can be used on a server to create web applications.
- Python can be used alongside software to create workflows.
- Python can connect to database systems. It can also read and modify files.
- Python can be used to handle big data and perform complex mathematics.
- Python can be used for rapid prototyping, or for production-ready software development.
Why Python?
- Python works on different platforms (Windows, Mac, Linux, Raspberry Pi, etc).
- Python has a simple syntax similar to the English language.
- Python has syntax that allows developers to write programs with fewer lines than some other programming languages.
- Python runs on an interpreter system, meaning that code can be executed as soon as it is written. This means that prototyping can be very quick.
- Python can be treated in a procedural way, an object-oriented way or a functional way.
Good to know
- The most recent major version of Python is Python 3, which we shall be using in this tutorial. However, Python 2, although not being updated with anything other than security updates, is still quite popular.
- In this tutorial Python will be written in a text editor. It is possible to write Python in an Integrated Development Environment, such as Thonny, Pycharm, Netbeans or Eclipse which are particularly useful when managing larger collections of Python files.
Python Syntax compared to other programming languages
- Python was designed for readability, and has some similarities to the English language with influence from mathematics.
- Python uses new lines to complete a command, as opposed to other programming languages which often use semicolons or parentheses.
- Python relies on indentation, using whitespace, to define scope; such as the scope of loops, functions and classes. Other programming languages often use curly-brackets for this purpose.
what is the usage of python?
what is the use of Python?
Python & Django Installation on Windows
- A system running Windows 10 with admin privileges
- Command Prompt (comes with Windows by default)
- A Remote Desktop Connection app (use if you are installing Python on a remote Windows server)
Python Installation on Windows
Step 1: Select Version of Python to Install
The installation procedure involves downloading the official Python .exe installer and running it on your system.
The version you need depends on what you want to do in Python. For example, if you are working on a project coded in Python version 2.6, you probably need that version. If you are starting a project from scratch, you have the freedom to choose.
If you are learning to code in Python, we recommend you download both the latest version of Python 2 and 3. Working with Python 2 enables you to work on older projects or test new projects for backward compatibility.
Note: If you are installing Python on a remote Windows server, log in via Remote Desktop Protocol (RDP). Once you log in, the installation procedure is the same as for a local Windows machine.
Step 2: Download Python Executable Installer
- Open your web browser and navigate to the Downloads for Windows section of the official Python website.
- Search for your desired version of Python. At the time of publishing this article, the latest Python 3 release is version 3.7.3, while the latest Python 2 release is version 2.7.16.
- Select a link to download either the Windows x86-64 executable installer or Windows x86 executable installer. The download is approximately 25MB.
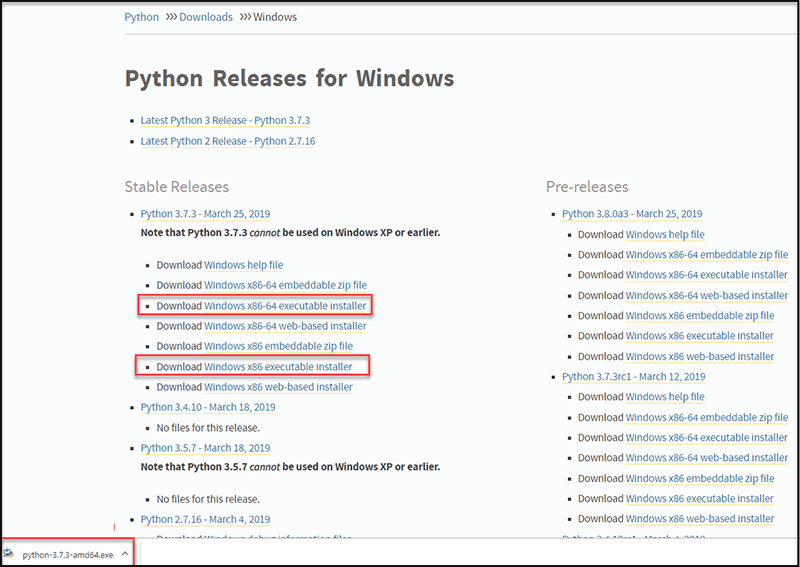
Note: If your Windows installation is a 32-bit system, you need the Windows x86 executable installer. If your Windows is a 64-bit version, you need to download the Windows x86-64 executable installer. There is nothing to worry about if you install the “wrong” version. You can uninstall one version of Python and install another.
Step 3: Run Executable Installer
1. Run the Python Installer once downloaded. (In this example, we have downloaded Python 3.7.3.)
2. Make sure you select the Install launcher for all users and Add Python 3.7 to PATH checkboxes. The latter places the interpreter in the execution path. For older versions of Python that do not support the Add Python to Path checkbox, see Step 6.
3. Select Install Now – the recommended installation options.
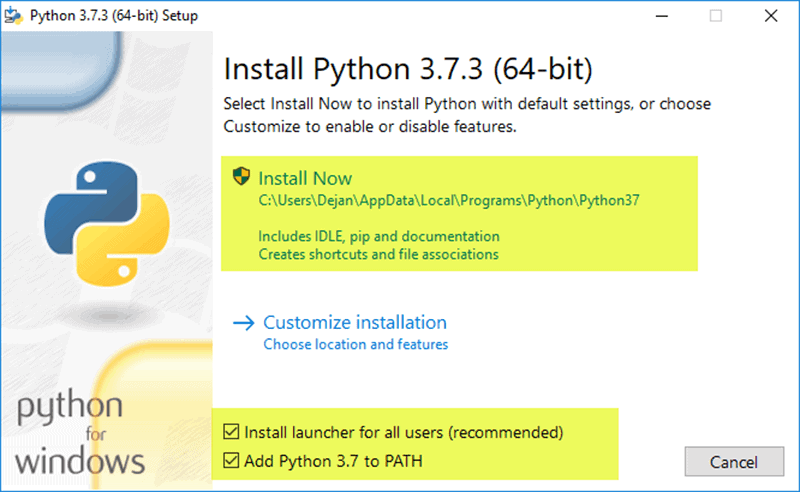
For all recent versions of Python, the recommended installation options include Pip and IDLE. Older versions might not include such additional features.
4. The next dialog will prompt you to select whether to Disable path length limit. Choosing this option will allow Python to bypass the 260-character MAX_PATH limit. Effectively, it will enable Python to use long path names.
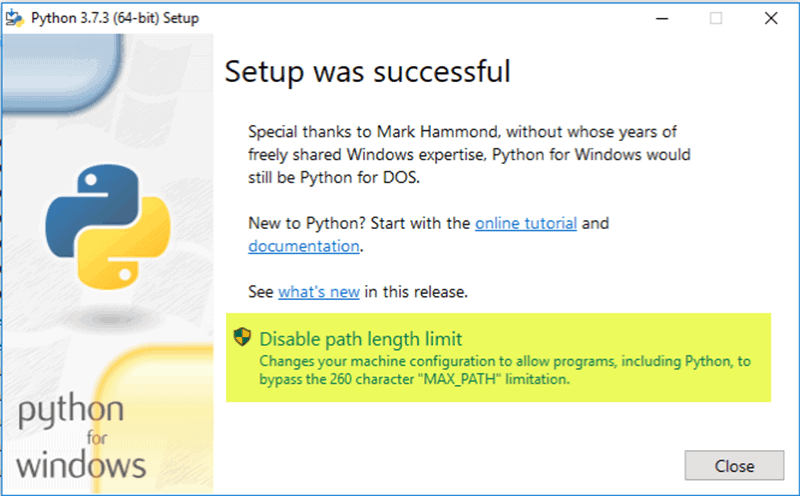
The Disable path length limit option will not affect any other system settings. Turning it on will resolve potential name length issues that may arise with Python projects developed in Linux.
Step 4: Verify Python Was Installed On Windows
- Navigate to the directory in which Python was installed on the system. In our case, it is C:\Users\Username\AppData\Local\Programs\Python\Python37 since we have installed the latest version.
- Double-click python.exe.
- The output should be similar to what you can see below:
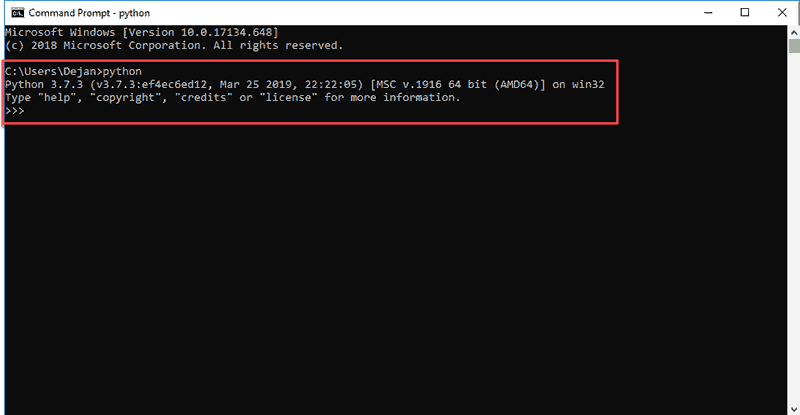
Note: You can also check whether the installation was successful by typing python –V in Command Prompt. The output should display your installed version of Python. In our case, it is “Python 3.7.3.”
Step 5: Verify Pip Was Installed
If you opted to install an older version of Python, it is possible that it did not come with Pip preinstalled. Pip is a powerful package management system for Python software packages. Thus, make sure that you have it installed.
We recommend using Pip for most Python packages, especially when working in virtual environments.
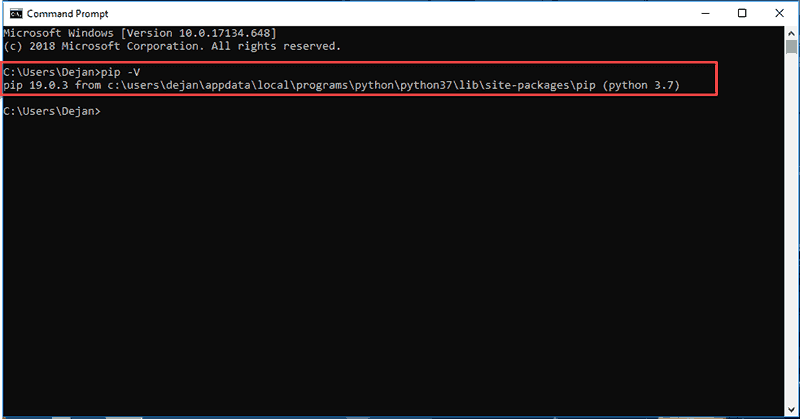
To verify whether Pip was installed:
- Open the Start menu and type "cmd."
- Select the Command Prompt application.
- Enter
pip -Vin the console. If Pip was installed successfully, you should see the following output:
Pip has not been installed yet if you get the following output:
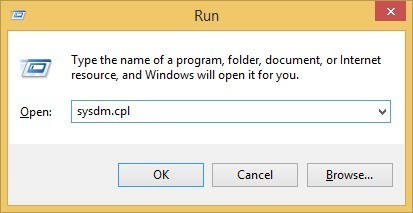
Setting up the Python path to system variables alleviates the need for using full paths. It instructs Windows to look through all the PATH folders for “python” and find the install folder that contains the python.exe file.
1. Open the Start menu and start the Run app.
3. Navigate to the Advanced tab and select Environment Variables.
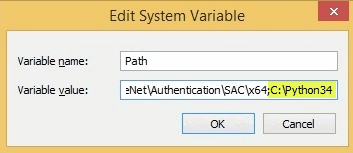
4. Under System Variables, find and select the Path variable.
5. Click Edit.
6. Select the Variable value field. Add the path to the python.exe file preceded with a semicolon (;). For example, in the image below, we have added ";C:\Python34."
By setting this up, you can execute Python scripts like this:
Python script.py
Instead of this: C:/Python34/Python script.py
As you can see, it is cleaner and more manageable.Step 7: Install virtualnv (Optional)
Why use virtualnv?
Python software packages are installed system-wide by default. Consequently, whenever a single project-specific package is changed, it changes for all your Python projects. You would want to avoid this, and having separate virtual environments for each project is the easiest solution.
To install virtualnv:
1. Open the Start menu and type "cmd."
2. Select the Command Prompt application.
3. Type the following
pip command in the console:How to Install Django on Windows: Step by Step Guide
Django introduction:
In this tutorial, you will learn how to install Django on Windows using
pip. After that, you will verify the installation, create a project, and start a Django development server.In this first Django article, we answer the question "What is Django?" and give you an overview of what makes this web framework special.
We'll outline the main features, including some of the advanced functionality that we won't have time to cover in detail in this module. We'll also show you some of the main building blocks of a Django application (although at this point you won't yet have a development environment in which to test it).
What is Django?
Django is a high-level Python web framework that enables rapid development of secure and maintainable websites. Built by experienced developers, Django takes care of much of the hassle of web development, so you can focus on writing your app without needing to reinvent the wheel. It is free and open source, has a thriving and active community, great documentation, and many options for free and paid-for support.
Django helps you write software that is:
- Complete
Django follows the "Batteries included" philosophy and provides almost everything developers might want to do "out of the box". Because everything you need is part of the one "product", it all works seamlessly together, follows consistent design principles, and has extensive and up-to-date documentation.
- Versatile
Django can be (and has been) used to build almost any type of website — from content management systems and wikis, through to social networks and news sites. It can work with any client-side framework, and can deliver content in almost any format (including HTML, RSS feeds, JSON, XML, etc). The site you are currently reading is built with Django!
Internally, while it provides choices for almost any functionality you might want (e.g. several popular databases, templating engines, etc.), it can also be extended to use other components if needed.
- Secure
Django helps developers avoid many common security mistakes by providing a framework that has been engineered to "do the right things" to protect the website automatically. For example, Django provides a secure way to manage user accounts and passwords, avoiding common mistakes like putting session information in cookies where it is vulnerable (instead cookies just contain a key, and the actual data is stored in the database) or directly storing passwords rather than a password hash.
A password hash is a fixed-length value created by sending the password through a cryptographic hash function. Django can check if an entered password is correct by running it through the hash function and comparing the output to the stored hash value. However due to the "one-way" nature of the function, even if a stored hash value is compromised it is hard for an attacker to work out the original password.
Django enables protection against many vulnerabilities by default, including SQL injection, cross-site scripting, cross-site request forgery and clickjacking (see Website security for more details of such attacks).
- Scalable
Django uses a component-based "shared-nothing" architecture (each part of the architecture is independent of the others, and can hence be replaced or changed if needed). Having a clear separation between the different parts means that it can scale for increased traffic by adding hardware at any level: caching servers, database servers, or application servers. Some of the busiest sites have successfully scaled Django to meet their demands (e.g. Instagram and Disqus, to name just two).
- Maintainable
Django code is written using design principles and patterns that encourage the creation of maintainable and reusable code. In particular, it makes use of the Don't Repeat Yourself (DRY) principle so there is no unnecessary duplication, reducing the amount of code. Django also promotes the grouping of related functionality into reusable "applications" and, at a lower level, groups related code into modules (along the lines of the Model View Controller (MVC) pattern).
- Portable
Django is written in Python, which runs on many platforms. That means that you are not tied to any particular server platform, and can run your applications on many flavours of Linux, Windows, and Mac OS X. Furthermore, Django is well-supported by many web hosting providers, who often provide specific infrastructure and documentation for hosting Django sites.
How popular is Django?
There isn't any readily-available and definitive measurement of popularity of server-side frameworks (although you can estimate popularity using mechanisms like counting the number of GitHub projects and StackOverflow questions for each platform). A better question is whether Django is "popular enough" to avoid the problems of unpopular platforms. Is it continuing to evolve? Can you get help if you need it? Is there an opportunity for you to get paid work if you learn Django?
Based on the number of high profile sites that use Django, the number of people contributing to the codebase, and the number of people providing both free and paid for support, then yes, Django is a popular framework!
High-profile sites that use Django include: Disqus, Instagram, Knight Foundation, MacArthur Foundation, Mozilla, National Geographic, Open Knowledge Foundation, Pinterest, and Open Stack (source: Django overview page).
Prerequisites:
- Before you install Django, you must make sure that Python is installed on your system. You can check out this guide — how to install python on windows to learn how to do it.
The commands that you will run in this tutorial were tested on the PowerShell shell, but most commands should work on Windows Command Prompt(CMD) with a few exceptions. For a smooth experience, I would suggest you use PowerShell for this tutorial. - First, you need to open PowerShell on your computer. You can do that by searching for PowerShell in the Windows search box or you can open the Run dialog box by holding the Windows logo key and R(
WIN+R). Once the dialog is open, typepowershell, and then click OK.You should now have the PowerShell window opened.

Step 2 - Verifying Python Installation
- Now that you have opened PowerShell on your computer, you’ll verify the installation of Python in the next section.
Before you install Django, first, you need to make sure that you installed Python on your system.
To do that, type the following command in PowerShell prompt to verify the installation:
> python -V-Voption logs the Python version installed on your system.After running the command, you should see output like this:
PS C:\Users\Username> python -V
Python 3.9.7
At the time of writing, it is Python 3.9.7. You might have a different version from mine, and that’s fine. As long as you see the Python version logged, Python is installed on your system.
Now that you’ve confirmed Python is installed on your system, you will upgrade
pip.Step 3 - Upgrading Pip
Python comes with
pipby default. But most of the time, it comes with an old version. it’s always a good practice to upgradepipto the latest version.Enter the following command to upgrade
pipon your system:> python -m pip install --upgrade pipYou’ll get output identical to the following screenshot showing you that the upgrade was a success:

Now you’ve upgraded
pip, you’ll create the project directory where you’ll install Django.In this section, you will create a directory that will contain your Django application. We will name it
django_projectsince this tutorial is a demo. But in a real project, you can give the directory a suitable name, such asforum,blog, etc.Change into your
Desktopdirectory with thecdcommand:> cd DesktopCreate the directory using the
mkdircommand:> mkdir django_projectMove into the
django_projectdirectory using thecdcommand:> cd django_projectYour prompt should now show you that you’re in the
django_projectdirectory as shown in the following output:PS C:\Users\Stanley\Desktop\django_project>Now that you’ve created the working directory for your project, you’ll create a virtual environment where you’ll install Django.
Step 5 - Creating the Virtual Environment
In this step, you’ll create a virtual environment for your project. A virtual environment is an isolated environment in Python where you can install the project dependencies without affecting other Python projects. This lets you create different projects that use different versions of Django.
If you don’t use a virtual environment, your projects in your system will use the same Django version installed globally. This might look like a good thing until the latest version of Django comes out with breaking changes causing your projects to fail altogether.
You can learn more about the virtual environment by following Python Virtual Environments: A Primer.
To create a virtual environment, type the following command and wait for a few seconds:
> python -m venv venvThe command will create a directory called
venvinside your project directory.Next, confirm the
venvdirectory has been created by listing the directory contents using thelscommand:> lsYou should see the directory
venvin the output as shown in the following screenshot:
Now you’ve created the virtual environment directory, you’ll activate the environment.
In this section, you’ll activate the virtual environment in your directory.
Run the following command to activate the virtual environment:
> venv\Scripts\activateAfter you run the command, you will see
a
(venv)at the beginning of the prompt. This shows that the virtual environment is activated:(venv) PS C:\Users\Stanley\Desktop\django_project>If you run into the error shown in the following screenshot on PowerShell when activating the virtual environment, for the sake of brevity, I described the reason and the solution in another post. Follow Solution to “Running Scripts Is Disabled On This System” Error on PowerShell and don’t close your PowerShell:

Now that you’ve activated the virtual environment for your project, the moment you’ve been waiting for is here. It’s time to install Django!
Step 7 - Installing Django
In this section, you will install Django on your system using
pip.Run the following command to install Django using
pip install:(venv)> pip install djangoThe command will install the latest version of Django. You should see Django being downloaded as shown in the following screenshot:

If you want to install a different Django version, you can specify the version as follows:
(venv)> pip install django==3.1Once the installation finishes, you need to verify that Django has been installed. To do that, type the following command:
(venv)> django-admin --versionYou will get output showing you the Django version installed on your system:
(venv) PS C:\users\stanley\Desktop\django_project> django-admin --version
3.2.7
At the time of writing, the latest Django version is
3.2.7, and that’s why my output shows that.You’ve now installed Django on your system, great job! You’ll begin to create a Django project.
Step 8 - Creating the Django Project
Now it’s time to create a project. A project has a different meaning from what you may be used to. The Django documentation defines it as:
A Python package – i.e. a directory of code – that contains all the settings for an instance of Django. This would include database configuration, Django-specific options and application-specific settings.
You create a project by using the command-line utility
django-adminthat comes with Django. The command generates files where you can configure the settings for your database, add third-party packages for your project to mention a few.Create the project using the
django-admin startprojectcommand:(venv)> django-admin startproject test_projectChange into the
test_projectdirectory:(venv)> cd test_projectType the following command to see the contents in the project directory:
(venv)> ls test_projectYou will get output similar to this:
(venv) PS C:\users\stanley\Desktop\django_project\test_project> ls

   Directory: C:\users\stanley\Desktop\django_project\test_project

Mode                LastWriteTime         Length Name

----                -------------         ------ ----

d-----         9/4/2021   1:25 AM                test_project

-a----         9/4/2021   1:25 AM            690 manage.py
The directory
test_projectcontains Django configuration files. Themanage.pyfile comes in handy when starting a development server, and that’s what you will do in the next step.Step 9 - Running the Development Server
Now that the project has been created, we will start the Django development server.
Start the development server using the
manage.py runservercommand:(venv)> python manage.py runserver
Next, visit http://127.0.0.1:8000/ in your web browser. You should see a page similar to the following screenshot:
Tip You can stop the server by holding
CTRL+C. To deactivate the virtual environment, you can typedeactivateon the prompt.Now, you are ready to start developing your project.
Conclusion:
You have come to the end of this tutorial, you learned how to install Django on Windows, verifying the installation and you also learned how to create a Django project, and start a development server. You can visit Django’s official tutorial to learn how to build an application, see Writing your first Django app, part 1.


